


Quick answer: C.H.A.O.S Mode runs all of Season 86, from August 3 to September 7, 2026, in four variants. Every 45 seconds you are shown two card modifiers and must pick one on a roughly 3-second timer — they are chosen, not rolled — from a restricted pool of 66 cards all normalised to Level 11, with modifier rarity escalating from Common early to Rare and Epic late. The skill is fast evaluation of two concrete offers, not memorising a random table.
C.H.A.O.S Mode is the headline format of Season 86 (K.H.A.O.S), live from August 3 to September 7, 2026 across four variants. Every 45 seconds — measured from the match clock at 2:56, 2:11 and 1:26 in a single game, with the HUD's "Next CHAOS" counter resetting to 0:44 each time — the game offers you two card modifiers and you pick one on a roughly 3-second timer. The pool is 66 cards, all normalised to Level 11, and each card carries three modifiers, one per rarity tier. Modifier rarity escalates as the match runs, so the pick that decides a close game is almost always the last one.
The single most important thing to understand: modifiers are chosen, not rolled. The prompt reads "Select modifier" and shows two options. Nothing is assigned to you. That makes C.H.A.O.S a mode about fast evaluation under a three-second clock, not a mode about luck — which is the opposite of how most players describe it.
Rate your deck against this meta
Get an instant AI grade, synergy score, and swap picks — build a deck below, or sign in to grade your current one. Free to start.
How CHAOS Mode Works
Access and Duration
C.H.A.O.S runs the full length of Season 86, August 3 to September 7, 2026, in the Game Mode Switcher. Any player can access it — there is no arena or trophy requirement — and every card plays at Level 11, so collection depth gives no advantage.
Season 86 runs it in four variants plus a Competitive League and a Global Tournament:
| Window | Format |
|---|---|
| August 3 – 17 | Ken's C.H.A.O.S Draft League — League Badge at 15 wins |
| August 17 – September 7 | C.H.A.O.S Triple Draft — the longest window of the season |
| August 17 – 24 | C.H.A.O.S Epic Only |
| August 24 – 29 | Ken's C.H.A.O.S Mega Draft Global Tournament — top-10,000 Leaderboard Finisher Badge |
| August 24 – 31 | C.H.A.O.S Sudden Death |
| August 31 – September 7 | C.H.A.O.S Infinite Elixir |
Three of the six formats are drafts — Ken's C.H.A.O.S Draft League, C.H.A.O.S Triple Draft, and Ken's C.H.A.O.S Mega Draft Global Tournament — and between them they cover every week from August 3 to September 7. Epic Only, Sudden Death and Infinite Elixir are not drafts. Worth planning around: draft skill has a five-week runway this season rather than a one-week one. Check the game modes page for what is live right now.
The Restricted Card Pool
You do not build from your full collection. C.H.A.O.S restricts deck building to a pool of 66 cards, counted in-game for Season 86, spanning 1 to 9 elixir and all normalised to Level 11. Every card in the pool was given modifiers deliberately, so cards that see little ladder play often carry the most transformative effects.
The pool counts base cards only. Hero and Evolution forms are not listed as separate entries — a card appears once regardless of which forms exist for it.
Before your first match, scroll the whole pool in the deck builder. The three-second selection timer means preparation is the actual competitive edge: you are recognising options, not reading them.
How Modifiers Work
At the start of every match and every 45 seconds afterwards, the game presents a "Select modifier" prompt with two options, on a roughly 3-second timer. Each modifier is tied to a specific card in your deck and transforms how it functions. You must pick one — there is no skip, though a "Signal Lost" no-modifier option does exist in the pool, so sometimes neither offer is an upgrade.
The cadence is exactly 45 seconds. Measured across three consecutive selections in one match: 2:56 → 2:11 → 1:26 on the match clock, with the "Next CHAOS" counter resetting to 0:44 each time.
You can have a maximum of four active modifiers per match, which means by the fourth selection your deck plays almost nothing like the one you built. The first modifier might make your Wizard's splash radius slightly larger. The fourth modifier might turn your Dart Goblin into a miniature Sparky. This escalation is the heartbeat of the mode.
The key strategic layer is that your opponent is also choosing modifiers. When their Ice Wizard suddenly freezes your entire push solid, that was not a bug -- they chose the freeze modifier at their last selection. Reading these changes in real time and adapting is what separates CHAOS Mode winners from players who feel like the mode is pure RNG.
Modifier Rarities and the Escalation System
Each of the 66 cards in the pool has three associated modifiers, one per rarity tier — confirmed in-game, where Goblin Giant appeared twice in one match with different effects: the Common "Javelin Junkies" (+100% spear range) and the Epic "Elec-trick-tians" (Sparky Spear Goblins). Rarity escalates as the match progresses:
| Selection | Rarity | Color | Power Level |
|---|---|---|---|
| 1st pick | Common | Blue | Noticeable but manageable |
| 2nd pick | Common | Blue | Similar to first pick |
| 3rd pick | Rare | Orange | Significant power spike |
| 4th pick | Epic | Purple | Game-warping, win-condition level |
This escalation means the first minute feels almost normal — both players are on baseline decks plus one minor enhancement. By the third selection the match transforms: in a verified Season 86 game, selections one and two offered Common/Common while selection three offered a Rare and an Epic together.
The practical consequence for your attention budget: spend it on the late picks. The first modifier rarely decides anything; the last one frequently does.
The practical takeaway: do not panic if you fall behind early. The third and fourth modifiers can completely reverse a losing position. Conversely, do not relax with a tower lead -- your opponent's Epic modifier might erase your advantage in ten seconds.
The Secret C.H.A.O.S. Badge
The headline reward is the Secret C.H.A.O.S. Badge, a Legendary Badge earned by winning three consecutive matches in CHAOS Mode. This is the only way to earn it -- you cannot buy it or earn it through other events.
Three consecutive wins sounds simple, but the random modifier system means any single match can swing wildly against you. You might win two matches on strong late-rarity offers, then find neither of your third-game options fits your deck while your opponent's does. Consistency and adaptability matter more than peak power when chasing this badge.
Playing one of these decks?
Deck Doctor grades any deck in seconds — synergy, meta fit, and the swaps that fix its weak spots. See your grade before you sign up.
How to Evaluate a Modifier Offer
Not all modifiers are equal. Some are minor stat tweaks that barely change how a card plays. Others turn a 3-elixir card into a game-ending threat that demands an immediate response. Understanding the modifier hierarchy lets you build decks that maximize your chances of being offered something powerful at each selection.
What a Game-Warping Offer Looks Like (March 2026 pool examples)
Barbarian Hut -- Spawns Mega Knights instead of Barbarians. This is widely considered the single strongest modifier in the mode. A 7-elixir building that continuously produces 7-elixir troops creates a value engine that most opponents simply cannot keep up with. Every few seconds, a full Mega Knight walks down the lane with jump damage, spawn damage, and 3,700+ HP. Your opponent has to spend 5-7 elixir defending each one while the Hut keeps producing them for free. If you get this modifier, place the Hut immediately and devote all your remaining elixir to defending it.
Dart Goblin -- Every dart becomes a Sparky attack. At 3 elixir, Dart Goblin is one of the cheapest cards in the pool. With this modifier, every single dart he fires deals Sparky-level damage. His attack speed is fast, which means the DPS output is astronomical -- he melts tanks, towers, and defensive troops in seconds. The counterplay is to Zap or Log him quickly, but if he is protected behind a Knight or any mini-tank, the opponent often cannot reach him before he takes a tower. Build your CHAOS deck assuming you might get this modifier and include cards that can tank for him.
Fireball -- Creates a Tornado before hitting the ground. This modifier transforms Fireball from a damage spell into a combination of damage and crowd control. The Tornado effect pulls all enemy troops toward the center of the blast radius before the Fireball lands, which guarantees that every troop in the area takes full damage. On ladder, Fireball's weakness is that spread-out troops only partially overlap with the blast. This modifier eliminates that weakness entirely. It also works offensively -- aim Fireball near the tower and the Tornado pulls nearby defensive troops into the blast alongside the tower damage.
Ice Wizard -- All attacks freeze enemies. Ice Wizard normally slows enemies. With this modifier, every attack applies a full freeze effect. Place him behind any tank and the opponent's defenders lock in place, unable to attack or move. The freeze reapplies with every hit, creating a permanent lockdown as long as Ice Wizard is alive. This is especially devastating against single-target defenders like Mini P.E.K.K.A. or Inferno Dragon that rely on continuous damage to kill tanks.
Executioner -- Throws three additional axes per attack. Executioner already has strong splash damage. Quadrupling his output makes him the best defensive card in the mode by a wide margin. A single modified Executioner placed behind your King Tower will shred any ground or air push before it crosses the bridge. Offensively, he clears the path for any tank you place in front of him.
Strong Supporting Modifiers
Beyond the five game-warping modifiers above, several cards receive modifiers that are reliably strong without being quite as dominant. Wizard gets enhanced splash radius and damage, making him the mode's best defensive splash unit. Witch's skeleton spawns double in frequency, and combined with her evolution ability she becomes nearly unkillable as a self-sustaining mini-tank. Golem's death creates an extra wave of Golemites, forcing opponents to deal with two rounds of death spawns. X-Bow gets increased range and hit speed, turning it into a relentless siege engine that locks onto towers from an oppressive distance.
The difference between S-tier and A-tier modifiers is reliability. The S-tier modifiers win games on their own. The A-tier modifiers win games when combined with good supporting cards or when the opponent lacks the specific counter.
Best CHAOS Mode Decks
Because you are drafting modifiers during the match, your deck needs to function on two levels: it must play a coherent game plan with zero modifiers for the opening stretch, and it must contain enough high-modifier-ceiling cards that you are likely to hit something powerful at each selection. The worst mistake is building a deck that only works if you get offered one specific modifier.
Deck 1: Modifier Maximizer (Recommended)
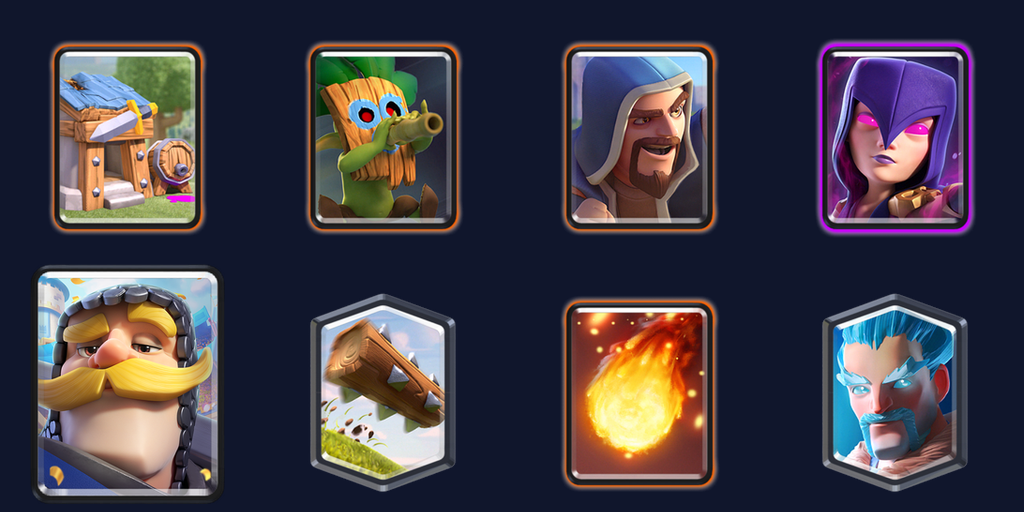
This deck contains five cards with S-tier or A-tier modifiers: Barbarian Hut, Dart Goblin, Fireball, Ice Wizard, and Wizard. When the game offers you a choice between two modifiers, the odds are high that at least one option powers up a card that can take over the match.
The opening minute is your weakest phase. You do not have any modifiers yet, and your deck's base-level game plan is defensive -- Knight and Witch handle most early pushes, Log deals with swarms, and Wizard provides splash coverage. Do not overcommit offensively during this window. Your goal is to survive with your towers intact until the modifiers start activating.
Once your first modifier hits, your entire strategy pivots around which card got enhanced. If Barbarian Hut receives its Mega Knight modifier, plant it immediately in the center-back of your arena and devote everything to keeping it alive. If Dart Goblin gets the Sparky modifier, wait for the opponent to commit elixir to a push, then drop a Knight at the bridge with Dart Goblin behind him -- the Sparky darts will shred their tower before they can respond. If Fireball gets the Tornado modifier, start using it aggressively on clumped defenders near the tower for guaranteed value.
By the third and fourth modifier selections, this deck typically has two or three enhanced cards active simultaneously. A match where both Barbarian Hut and Dart Goblin have their top modifiers is virtually unwinnable for the opponent.
Deck 2: Spell Chaos Control
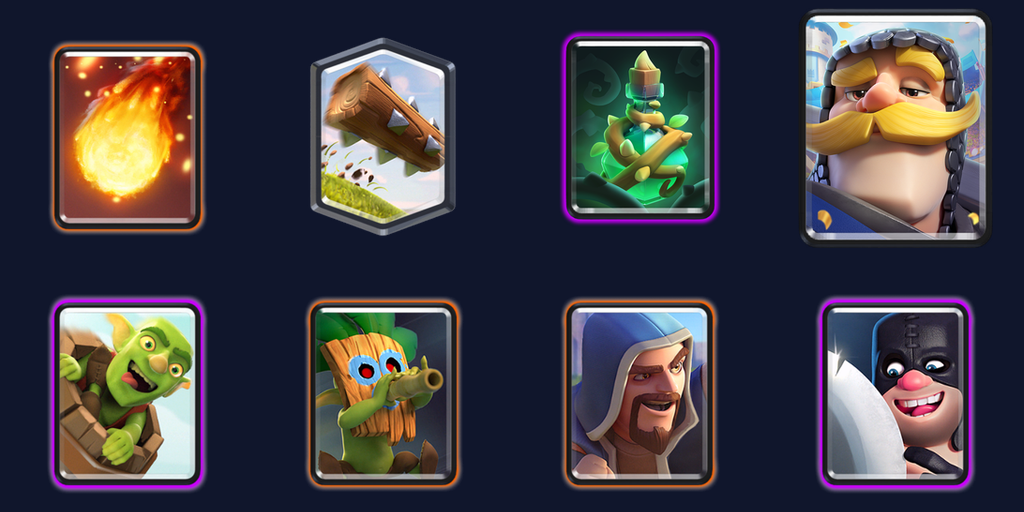
This deck plays a patient control game, chipping with Goblin Barrel while defending with Knight and two splash units. It runs three spells, which gives you flexible defensive answers regardless of what modifiers appear. The core philosophy is that you do not need to build a modifier-dependent offense if your defense is airtight -- Goblin Barrel chip damage adds up over a four-minute match, and modified Fireball or Executioner make your defensive wall nearly impenetrable.
The ideal game flow starts with Goblin Barrel pressure to test their small spell. If they Log the barrel, your Dart Goblin and Wizard are safe from Log for the next cycle. Defend their pushes with Knight and whichever splash unit matches the threat, and wait for the modifier selections to tilt the game in your favor. When Fireball receives the Tornado modifier, it becomes a dual-purpose tool: pull their defenders into a clump and deal massive damage simultaneously. When Executioner gets triple axes, stop sending troops on offense entirely and just defend -- three towers of chip damage from Goblin Barrel plus spell cycling will close the game while Executioner deletes everything they send at you.
Deck 3: Golem Beatdown Chaos
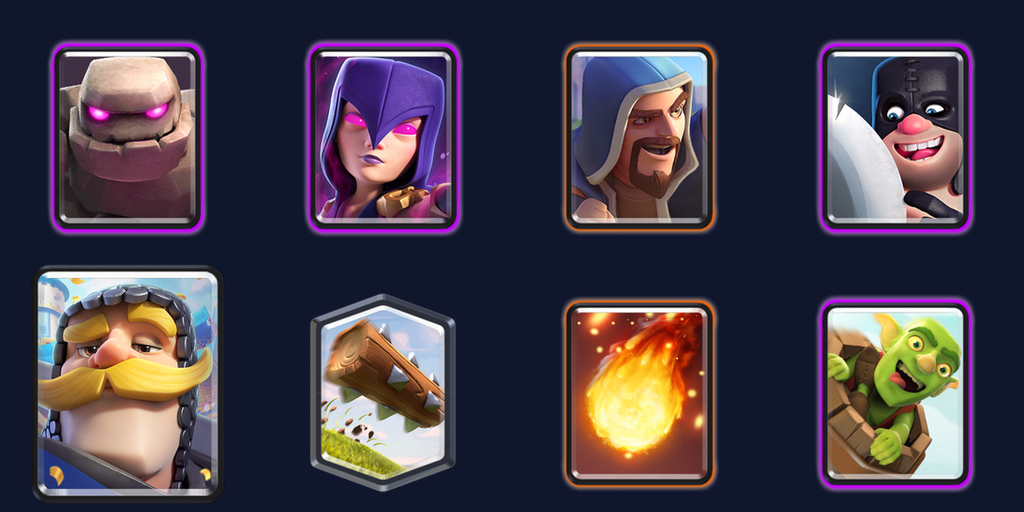
This deck accepts a slower start in exchange for an overwhelming mid-game and late-game. Golem is the anchor: an 8-elixir tank that demands answers and creates space for everything behind it. The three support splash cards (Witch, Wizard, Executioner) each have strong modifiers, so by the time you launch your first serious Golem push -- ideally at the second or third modifier selection -- you will have at least one enhanced support card trailing behind him.
Play single elixir cautiously. Defend with Knight and spells, chip with Goblin Barrel when the opportunity arises, and do not place Golem until you have at least one active modifier on a support card. Once double elixir arrives with three or four modifiers active, drop Golem at the back and stack every modified support card behind him. A Golem push backed by a triple-axe Executioner and a double-spawn Witch is essentially undefendable. If the opponent somehow stops it, you will have enough elixir to rebuild immediately because double elixir never lets you run dry.
The risk with this deck is losing early. If your opponent gets aggressive modifiers before you do and takes a tower in single elixir, the comeback is difficult because Golem decks need both towers standing to build safely. Use Knight and Log aggressively in the first minute to prevent early damage.
How to Win Three in a Row for the Badge
Winning a single CHAOS Mode match is straightforward -- the modifiers are powerful enough that even a bad deck can get lucky. Winning three consecutive matches requires a different mindset. You need to minimize variance and maximize the floor of your performance, not the ceiling.
Study the Modifier Pool Before You Queue
Every card in the 66-card pool has three modifiers you can review during deck building — 198 in total. Spend ten minutes reading them before your first match. This is not just academic preparation -- it directly impacts your in-game decision making. When the roughly 3-second selection window pops up, you will recognize both options immediately instead of scrambling to read and understand them under time pressure. Those seconds matter. Players who already know the modifier pool make faster, better selections.
Knowing the full modifier pool also helps you read your opponent. If their Ice Wizard suddenly drops behind a tank and starts freezing your entire defense, you know exactly what happened and can immediately adjust -- spread your defenders wider, use ranged troops instead of melee, or drop spells on the Ice Wizard directly. Without that knowledge, you waste ten seconds figuring out why your troops are frozen, and by then the push has reached your tower.
Ignore the Elixir Rules You Learned on Ladder
Normal deck building prioritizes keeping your average elixir between 3.0 and 4.0 for smooth cycling. CHAOS Mode breaks this principle. A 6-elixir Barbarian Hut that spawns Mega Knights is the most efficient elixir investment in the game. An expensive deck that lands two or three high-ceiling modifiers will outperform a cheap cycle deck every time, because modified cards generate value far beyond their elixir cost.
Build for modifier ceiling, not for cycle speed. Include Barbarian Hut even though it is 6 elixir. Include Golem even though it is 8. The modifiers will justify the investment if you land the right ones, and if you do not, your cheap utility cards (Knight, Log) will keep you alive long enough for the next selection.
Adapt to What You See, Not What You Expected
The most common mistake in CHAOS Mode is sticking to your pre-game plan after modifiers reshape the match. You queued with a Golem beatdown strategy, but your first two modifiers enhanced Fireball and Executioner instead of Golem or Witch. The wrong reaction is to keep waiting for Golem modifiers. The right reaction is to shift to a spell-control game plan -- use modified Fireball and Executioner to dominate defense and chip the tower with Goblin Barrel.
Similarly, watch for your opponent's pivot. If they suddenly stop playing Ice Wizard on defense and start dropping him behind a Golem, they got the freeze modifier and their entire strategy just changed. Stop sending swarm troops. Stop relying on Mini P.E.K.K.A. to solo-defend. Spread your defenders, use spells to kill the Ice Wizard before he reaches your side, and adjust your push timing to avoid stacking into a freeze lock.
Play When the Odds Favor You
If you are chasing the three-win streak for the C.H.A.O.S. Badge, timing matters. Play during off-peak hours -- early morning and late night tend to have shallower matchmaking pools with fewer high-skill players. This is not a guaranteed advantage, but across three consecutive games, any edge in matchmaking quality compounds. You need to win all three, not just most of them. Stack every advantage you can.
If you lose your second game after winning the first, take a break. Tilt -- the emotional frustration of a close loss -- leads to worse modifier decisions and sloppier play. Walk away for ten minutes, then queue fresh.
CHAOS Mode Rewards
Beyond the badge, CHAOS Mode wins contribute to your broader progression. Victories count toward daily win requirements for Magic Lucky Chests, so you earn chests at the same rate as playing ladder, and they feed any win-counted seasonal event live at the time. Gold and experience rewards are standard battle rates. The mode is not just a novelty -- across the August 3 to September 7 window it is a fully productive way to grind Season 86.
| Reward | How to Earn |
|---|---|
| Secret C.H.A.O.S. Badge (Legendary) | Win 3 consecutive CHAOS Mode matches |
| Magic Lucky Chest progress | Wins count toward daily requirements |
| Gold and experience | Standard battle rewards |
Recommended Next Reads
- Chaos Mode Badges Guide: Secret Badge, Legendary Badge & Badge Hunting Tips (2026) — Secret badge hunting with the 3-win streak requirement
- CHAOS Mode Deck Tier List — S/A/B/C Rankings for the July 2026 Return — Tier list for modifier-ceiling deck building with July 2026 projections
- Clash Royale 10th Anniversary Update: Everything New in Season 81 (March 2026) — Season 81 context when CHAOS Mode launched
- Clash Royale June 2026 Balance Changes (Season 84) — Meta context for CHAOS return in July
- CHAOS Modifier Database — search every catalogued Season 86 modifier by card and power tier before you draft
Playing one of these decks?
Deck Doctor grades any deck in seconds — synergy, meta fit, and the swaps that fix its weak spots. See your grade before you sign up.
Frequently Asked Questions
How long is CHAOS Mode available?
C.H.A.O.S runs from August 3 to September 7, 2026 in Season 86, with individual variants opening and closing inside that window. After the season it leaves the Game Mode Switcher. If you want a badge, do not wait for the last week — give yourself enough attempts.
Do card levels matter in CHAOS Mode?
No. Every card in the 66-card pool plays at Level 11 in C.H.A.O.S, so collection depth gives no advantage at all — a Level 1 Dart Goblin and a Level 16 Dart Goblin are the same card in this mode. What decides matches is which of the two offered modifiers you pick every 45 seconds.
Can I use Champions or Heroes in CHAOS Mode?
Only cards from the 66-card restricted pool are available, all at Level 11. Check the pool during deck building -- some Champions and Heroes may be included, but most of the pool consists of standard troops, spells, and buildings.
What happens if I lose during my win streak?
Your streak resets to zero. You must win three consecutive matches -- any loss restarts the count. There is no limit to attempts, so you can keep trying until the season ends on September 7.
Is CHAOS Mode replacing any existing game mode?
No. CHAOS Mode is a limited-time addition to the Game Mode Switcher. All existing modes -- Ladder, Ranked, Party, Challenges -- remain available alongside it.